Saturday, November 30, 2013

Zentangle Workshop - Week 4

This week we learned to draw a few more tangles: Finery, Echoism, Flukes, Beelight, Chillon, and Bales.

This Zentangle tile was drawn with different size tip pens; the smaller tip helps when the pattern becomes smaller (away from the viewer).


Then the book talks about Auras and Rounding: two enhancers.  Here is an example of Auras - lines around a tangle (around Isochor and Vega below):

And Rounding - darkening nooks and crannies in tangle with ink to give it a more defined and finished look.  See it filling the background of a few tangles below (Poke Root, Tipple, Isochor, and Festune).


And here are a couple more Zentangle tiles working with some of the new tangles and tangleations.


Thursday, November 21, 2013

Zentangle Workshop - Week 3


This week, we are working on Tangleations (variations of tangles), black Zentangle tiles, tonal values, and 2 new tangles - Purk and Vega.

Tangleations are variations on an existing tangle.  Here are some of my tangleations of the tangles we've studied so far:


And an ATC (Artist Trading Card) created with some of them:
Then we studied tonal values and created a sample using the tangle we've studied so far on white and on black paper.  Here are my samples:

Working on black paper is very different and I think it will take me a little while to get used to.  Drawing the tangles is usually not a problem, but I find it hard to get really good coverage on large while areas.  Also, instead of adding shadows in the end, you're supposed to add highlights to give the shapes some form; I find adding highlights a lot harder than adding shadows :).  Here are a couple of pieces I created on black:


And a couple on white tiles... much easier!


I hope you enjoyed this week's pieces.

Tuesday, November 12, 2013

Zentangle Workshop - Week 2

Before I get on to this week's workshop, here are some of the art I created this week (one a day) to practice the tangles we learned in week 1.


This week, we are working on 11 tangles.  Rather than posting my steps, I will give you links to the tangle instructions already on the web (which I got from a site I love TanglePatterns.com ):
Poke Root, Festune, Hollibaugh, Shattuck, Nipa, Jonqual, Isochor, Printemps, Amaze, Mooka, and Flux.

Here are examples from my practice sessions:

After you practice each one, you put them together.  Here are some I have created so far with these tangles and some from last week:

I hope you enjoyed this week's tangles and give them a try.

Sunday, November 3, 2013

Zentangle Workshop - Week 1

I belong to a Yahoo group which has workshops based on books.  Once a book is chosen, everyone interested signs up, buys the book, gathers the materials needed and waits for it to start.  A couple of the group members prepare the lessons based on the book and then post one lesson a week with assignments.  The participants work on the lesson and post their assignments in their picture folder and get credit for the lesson.  It is always fun and I have always learned a lot.

Today the group is starting a new workshop:  One Zentangle a Day based on the book with the same name by Beckah Krahula.  I'm definitely part of this one as I love Zentangles and also wanted to get into this art form as a way to relax (as I have finally accepted meditation does not work for me).

So... Zentangle is an art form that anyone can do; you don't need to know how to draw - each step to create a tangle is clearly identified... you just follow along :).  You can do it also!  You will see how easy and fun it is.

This week, we are working on 6 tangles.  I like to copy the steps for each tangle so I have a record of the tangles I've learned and know how to create them.  Here are the first 6: 


Why don't you give them a try?  All you need is a pen, pencil, and paper.  Here are examples from my practice sessions:


Once you have practiced these, you can put them all together in one piece of art.  To start out, lightly create a "string" with your pencil.  A string is basically one continuous line dividing your paper into random sections.  Think of dropping a string on a piece of paper and the shapes it would make.  There is no right or wrong, just give it a try.  Here are some examples of strings:


So, once you have the string down on paper, you start filling in each area with a tangle.  Makes sense?  Here are some examples I created.


I hope you enjoyed these tangles and have fun trying them yourself.  If you do decide to try them, please leave me a comment so I will be motivated to post more :)

Saturday, February 16, 2013

Re-purposing Plastic Bags

A couple of weeks ago I watched a video clip about a woman who makes purses out of plastic bags.  The video was not specifically about it or how she does it; she was just talking about how she started using eco friendly materials (newspapers and plastic bags) to create her baskets and purses respectively.

So, it inspired me to learn about plastic bags and how you can use them to create something nice and useful.  After a couple of searches on Pinterest, I had all I needed :).  I  learned that plastic bag yarn is called plarn (I assume it comes from plastic yarn), and the easiest way to make the yarn from plastic bags.  Here is a link explaining how to make yarn from plastic bags; this is the method I use - a continuous string from beginning to end of the bag.  I should mention, though, that the most popular method I see out there on the net is by cutting the bag across in strips; with this method you end up with loops the width of the bag that you then have to connect to each other to make yarn.
Basket with plarn
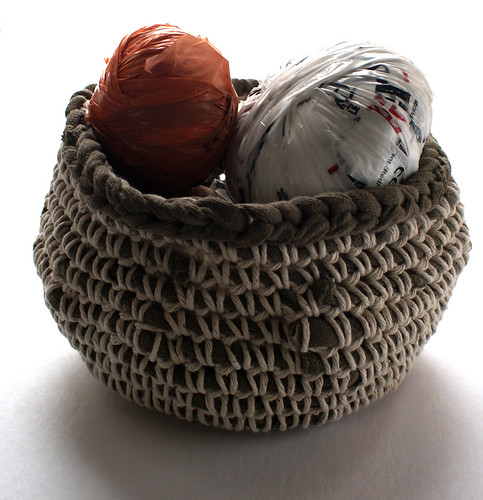
Plastic bag yarn (plarn) inside a basket made with an old t-shirt and baking string


I spent a couple of hours cutting bags and making plarn  (see picture above) and then started crocheting - I decided I liked the look of the crocheted items the best.  The first thing I made was a little bowl from those plastic bags you put your fruit and vegetables in at the supermarket (very thin, bunched up at the bottom - you know the ones?).  Because I only had very large or very small crochet needles, I went with the small.  Here is what the bowl turned out like:
Basket crocheted with plarn
Basket made with plarn from thin fruit/vegetable plastic bags - scraps of hemp were crocheted on  the edge
I then made a couple of more bowls with different colored bags to see how they would turn out - the white/red one is still in progress, but I wanted to show the plarn so you could see what it looks like:
Basket crocheted with plarn
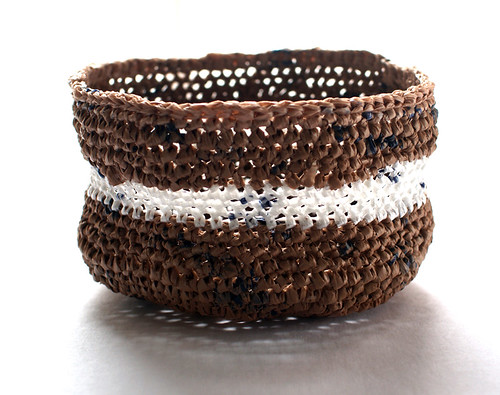
Basket crocheted with plastic bags
Plarn basket in progress
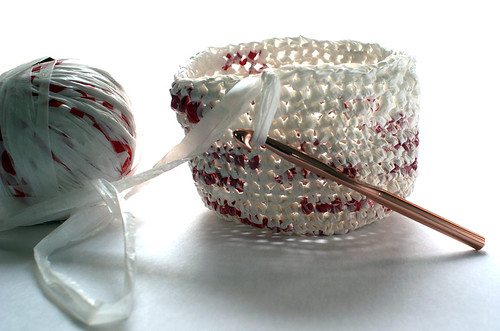
In-progress basket made from white with red writing/logos plastic bags


I wanted to try something a bit more useful; I love the bowls, but I wanted to make something I could carry with me.  Considering I know only a couple of crochet stitches and no concept of how you should go about making something like this, it didn't turn out so bad, did it?  I added a couple of small antique buttons to close it, and they just fit into the crocheted holes.
Business card holder made from plarn
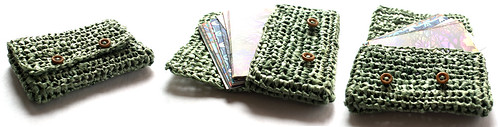
3 views of my business card holder I will carry with me from now on :)


After that I got a bit more daring :).  I decided to make a bag.  I thought it would be a bag to carry stuff in, but half-way through, it started looking more like a purse... lol... as I said, I have no idea what I'm doing with crochet, I just make it up as I go along.  So... this is what my new purse looks like; it was made with white bags with black writing, and one grey bag (for the outlines).  The button is an antique button from my stash, and this time I did make a button hole :).
One of a kind purse with "stuff" in it.  It does stand up on its own.

The empty finished purse


I hope my attempts inspire you to try it out.  Let me know if you do and how it turns out.  Would love to see pictures :)